藉由 Vue h function 讓 Quasar Dialog 更簡單複用
大家好,我是鱈魚。(^∀^●)ノシ
Quasar 是一個基於 Vue 的全端框架,具體內容可以看看官方文件介紹。
不過目前我主要還是把 Quasar 當 UI 套件用。(╯▽╰ )
Quasar 的 Invoking custom component
Quasar 的 Dialog 有一個很有趣的功能,在文件稱為「Invoking custom component」,也就是可以以命令式(imperative)呼叫任何自定義的 Dialog 元件。
這在建立複雜的後台系統很方便,除了元件可以作為 Dialog 重複使用,更可以保持 template 乾淨,不會充滿大量與目前元件邏輯無關的 html 內容,讓程式碼更簡潔、內聚一點。
但是有個小困擾,文件表示必須先將元件包裹於 q-dialog 並調用 useDialogPluginComponent,
也就是說我有一個 CreateForm 元件要變成 Dialog,要建立一個新元件:
CreateFormDialog.vue
<template>
  <q-dialog ref="dialogRef" @hide="onDialogHide">
    <create-form>
      <!--
        ...content
        ... use q-card-section for it?
      -->
    </create-form>
  </q-dialog>
</template>

<script setup>
import { useDialogPluginComponent } from 'quasar'
import CreateForm from './components/create-form.vue'

const props = defineProps({
  // ...your custom props
})

defineEmits([
  ...useDialogPluginComponent.emits
])

const { dialogRef, onDialogHide, onDialogOK, onDialogCancel } = useDialogPluginComponent()

function onOKClick() {
  onDialogOK()
}
</script>接著使用 $q.dialog 呼叫:
$q.dialog({
  component: CreateFormDialog,
})成功把 CreateForm 變成 Dialog 開啟了!ˋ( ° ▽、° )
不過這樣會導致每有一個元件想以 Dialog 形式開啟,就會多一個 xxxDialog.vue 的變體元件,實在是有點麻煩且多餘。
但是我們知道,其實 Vue 內部的 VDOM 都是透過 h function 建立,所以其實我們可以利用 h function 簡化這個過程。
TIP
h function 就是所謂的渲染函數,詳細說明可以看看官方文件
h function 的寫法很簡單,其參數依順序如下:
- type:除了 html tag 外,也可以是 Vue 的元件。
- props:DOM 的參數,也可以是元件的 prop。
- children:此 DOM 的子元素,也可以是元件的 slot
import { h } from 'vue'

const vnode = h(
  'div', // type
  { id: 'foo', class: 'bar' }, // props
  [
    /* children */
  ]
)換句話說,剛剛的程式碼:
$q.dialog({
  component: CreateFormDialog,
})可以透過 h function 改寫成:
$q.dialog({
  component: h(
    QDialog,
    {},
    { default: () => h(CreateForm) }
  )
})鱈魚:「這樣就不用一直建立 Dialog 變體元件了!(≧∇≦)ノ」
路人:「這樣程式碼看起來很可怕欸。(゚Д゚*)ノ」
鱈魚:「也是捏,讓我們重構、封裝一下。(。・∀・)ノ゙」
重構、封裝
首先第一步,讓我們建立協助提取元件型別的實用 function。
推薦官方工具
推薦使用官方的 vue-component-type-helpers
src/types/utils.type.ts
/** 提取 Vue Component 之內部 props
 *
 * 會將 style、class、event 全部取出來
 */
export type ExtractComponentProps<TComponent> = TComponent extends new () => {
  $props: infer P;
}
  ? P
  : never

/** 提取 Vue Component slots */
export type ExtractComponentSlots<TComponent> = TComponent extends new () => {
  $slots: infer P;
}
  ? P
: never接著建立基於 Quasar 的 utils 工具。
主要有 2 個 function:
- wrapWithDialog:用於將指定元件使用 QDialog 包起來。
- openUsingDialog:將 wrapWithDialog 包裹後的元件,使用 Dialog 開啟。
src/common/utils-quasar.ts
import { Dialog, QDialog, QDialogProps } from 'quasar'
import { Component, h } from 'vue'
import { ExtractComponentProps, ExtractComponentSlots } from '../types'

/** 將 Vue SFC 元件包装為 QDialog,可以更簡單配合 $q.dialog 使用
 *
 * @param component Vue SFC 元件
 * @param props SFC 內所有參數,包含 class、style、event 等等
 * @param dialogProps QDialog 原本參數
 *
 * @example
 * ```typescript
 * const component = wrapWithDialog(EditForm, {
 *   data,
 *   onSubmit() {
 *     dialog.hide();
 *   },
 * });
 *
 * const dialog = $q.dialog({ component });
 * ```
 *
 * @example
 * ```typescript
 * $q.dialog({
 *   component: wrapWithDialog(
 *     BrandLog,
 *     {
 *       data,
 *       class: 'w-full'
 *     },
 *     {
 *       fullHeight: true,
 *     }
 *   ),
 * });
 * ```
 */
export function wrapWithDialog<Comp extends Component>(
  component: Comp,
  props?: ExtractComponentProps<Comp>,
  dialogProps?: QDialogProps,
  slots?: ExtractComponentSlots<Comp>
) {
  return h(QDialog, dialogProps, {
    default: () => h(component, props ?? {}, slots ?? {}),
  })
}

/** 使用 Quasar Dialog 開啟元件
 *
 * @param component Vue SFC 元件
 * @param props SFC 內所有參數,包含 class、style、event 等等
 * @param slots SFC 插槽
 * @param dialogProps QDialog 原本參數
 * @returns
 *
 * @example
 * ```typescript
 * const dialog = openUsingDialog(EditForm, {
 *   data,
 *   onSubmit() {
 *     dialog.hide();
 *   },
 * });
 * ```
 */
export function openUsingDialog<Comp extends Component>(
  component: Comp,
  props?: ExtractComponentProps<Comp>,
  dialogProps?: QDialogProps,
  slots?: ExtractComponentSlots<Comp>
) {
  return Dialog.create({
    component: wrapWithDialog(component, props, dialogProps, slots),
  })
}現在我們可以把剛剛的程式碼:
$q.dialog({
  component: h(
    QDialog,
    {},
    { default: () => h(CreateForm) }
  )
})改寫成這樣:
openUsingDialog(CreateForm)是不是整潔很多啊!♪( ◜ω◝و(و
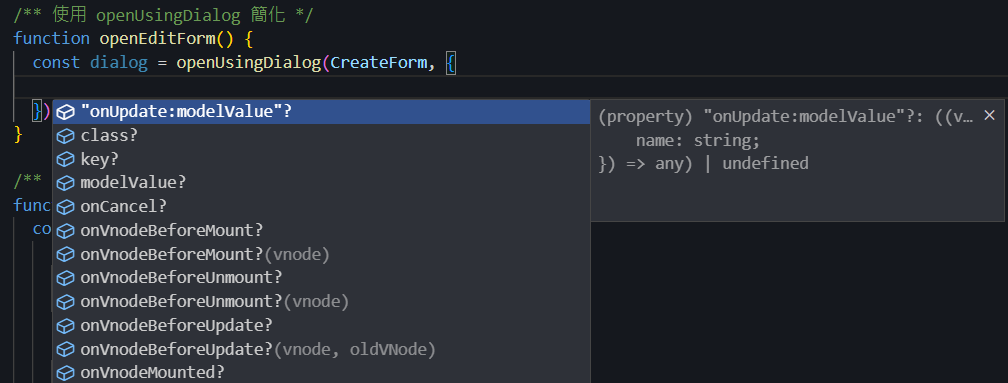
而且因為有加上型別推導,所以使用時會有很完整的型別提示。

現在可以配合元件事件撰寫邏輯了。( •̀ ω •́ )✧
Vue 會自動將元件 emit 的事件名稱加上 on 前綴,所以:
- update:modelValue 會變成 onUpdate:modelValue
- cancel 會變成 onCancel
function openCreateForm() {
  const dialog = openUsingDialog(CreateForm, {
    'onUpdate:modelValue': function (data) {
      alert(`送出資料: ${data.name}`)
      dialog.hide()
    },
    onCancel() {
      dialog.hide()
    }
  })
}以上用法讓大家參考參考,如果有問題還不吝指教,鱈魚感謝大家!( ´ ▽ ` )ノ
更完整的範例請見範例程式碼。
總結 🐟
- 透過 h function 簡化 Quasar Dialog 的 Invoking custom component 用法
- 將 h function 封裝,更容易使用