CodToys - EP01:緣起
自己寫文章時習慣在文字中穿插顏文字。( •̀ ω •́ )✧
最近較常寫文章分享,輸入顏文字的次數也越來越多了。
雖然 Windows 可以按下「Window + .」也可以快速選擇顏文字
但是身為資深顏文字愛好者,一定有自己的顏文字庫啊!
於是萌生了自己做一個鍵盤快捷鍵小工具的念頭,此專案就這麼誕生了。ԅ(´∀` ԅ)
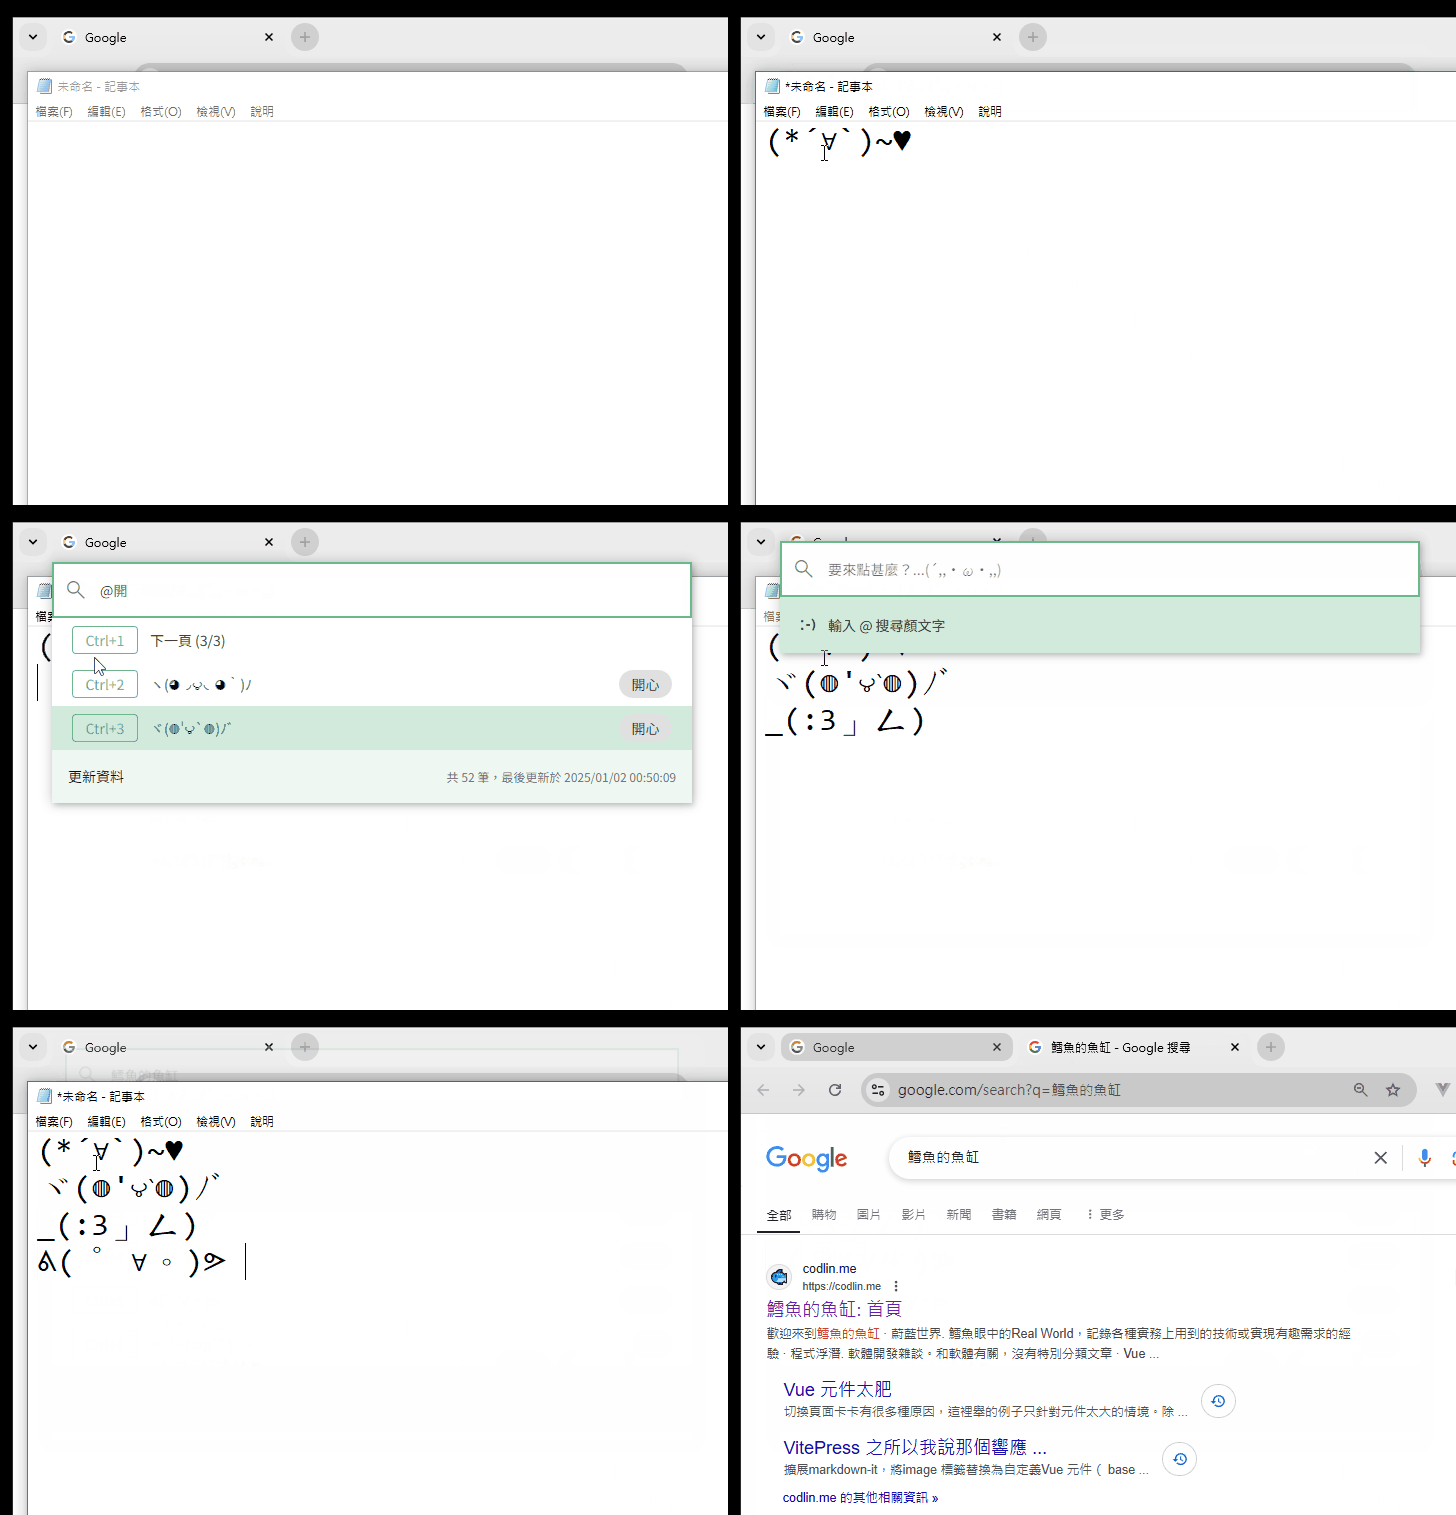
讓我們搶先看一下成果!ˋ( ° ▽、° )

路人:「聽說現在年輕一輩沒人在用顏文字的捏。('◉◞⊖◟◉` )」
鱈魚:「我就老,我就是要用。ᕕ( ゚ ∀。)ᕗ 」
背景
開始前來簡單了解一下相關背景。
PowerToys
PowerToys 是微軟釋出的開源專案,提供了一系列實用功能。例如:顏色選擇器、找不到命令等等。
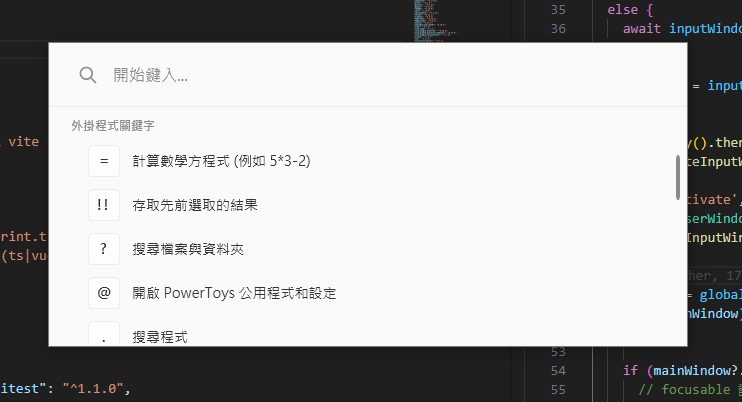
其中 PowerToys Run 工具是我們的主要靈感來源,本專案
抄襲借鑑其設計。Electron
Electron 是一個可以用 HTML、CSS、JavaScript 建立跨平台桌面應用程式的框架。
此框架由 GitHub 開發,有許多知名應用程式也用 Electron 開發,例如:VS Code、Slack、Discord 等等。
特點
目前主要功能規劃與特點如下:
鍵盤優先
呼叫工具、選擇功能皆使用鍵盤操作,盡可能在不中斷輸入的情況下快速使用
關鍵字搜尋
根據輸入的關鍵字過濾,提供候選功能
功能:顏文字資料庫
從 Notion Database 取得顏文字資料,選擇後複製至剪貼簿
介面則模仿 PowerToys Run 的啟動器,按下 Ctrl + Space 就會跳出類似下圖輸入框。

讓我們開始吧!( •̀ ω •́ )✧
開發
專案基於以下技術或套件開發:
在現有 Vue 專案中加入 Electron
雖然官方推薦使用 Electron Forge 建立專案,不過我已經有一個設定完成的 Vue 模板,所以這次使用 vite-plugin-electron 來整合 Electron。
步驟沒什麼特別的部分,基本上完全依照文件操作。
一陣猛如虎的操作後,我們得到了初始環境!ˋ( ° ▽、° )
開啟視窗
第一步當然是先做一個簡單的輸入框。
src\pages\index.vue
<template>
  <div class="flex-col">
    <q-input
      v-model="inputValue"
      placeholder="要來點甚麼?...(´,,•ω•,,)"
      autofocus
      outlined
      square
    >
      <template #prepend>
        <q-icon name="search" />
      </template>
    </q-input>
  </div>
</template>

<script setup lang="ts">
import { ref } from 'vue'

const inputValue = ref('')
</script>接著讓我們啟動 Electron 魔法,把網頁變成應用程式視窗!◝( •ω• )◟
electron\main.ts
import process from 'node:process'
import {
  app,
  BrowserWindow,
} from 'electron'

async function createInputWindow() {
  const newWindow = new BrowserWindow({
    width: 400,
    height: 100,
    backgroundColor: '#fff',
    frame: false,
    resizable: false,
  })
  // 隱藏預設系統選單
  newWindow.setMenu(null)

  if (process.env.VITE_DEV_SERVER_URL) {
    await newWindow.loadURL(process.env.VITE_DEV_SERVER_URL)
  }
  else {
    await newWindow.loadFile('dist/index.html')
  }

  return newWindow
}

let mainWindow: BrowserWindow | undefined

app.whenReady().then(async () => {
  mainWindow = await createInputWindow()
})

// 當所有視窗關閉時退出應用程式
app.on('window-all-closed', () => {
  if (process.platform !== 'darwin') {
    app.quit()
  }
})BrowserWindow 表示一個視窗,就像是開啟一個網頁一般。
app.whenReady 則表示在應用程式準備好時執行。
現在讓我們執行 npm run dev 看看效果吧!

輸入框出現惹!(/≧▽≦)/
綁定全域快捷鍵
接著是最重要的一步,要綁定全域快捷鍵,當按下 Ctrl + Space 時顯示視窗。
這裡需要使用 globalShortcut 模組。
此模組可以註冊全域快捷鍵,即使視窗沒有聚焦,依然可以執行已註冊的按鍵事件。
一開始先保持簡單,按鍵組合先寫死 Ctrl + Space,未來有需要再加入設定功能。
electron\main.ts
// ...

async function createInputWindow() {
  const display = screen.getPrimaryDisplay()

  const newWindow = new BrowserWindow({
    // 設為螢幕寬度的三分之一
    width: display.bounds.width / 3,
    height: 100,
    // 一開始隱藏視窗
    show: false,
    // ...
  })

  // ...
}

let mainWindow: BrowserWindow | undefined

app.whenReady().then(async () => {
  mainWindow = await createInputWindow()

  const ret = globalShortcut.register('Ctrl+Space', () => {
    if (!mainWindow)
      return

    if (mainWindow?.isVisible()) {
      mainWindow.hide()
      return
    }

    mainWindow.show()
  })

  if (!ret) {
    console.error('registration failed')
  }
})

app.on('window-all-closed', () => {
  if (process.platform !== 'darwin') {
    app.quit()
  }

  globalShortcut.unregisterAll()
})現在讓我們按按看 Ctrl + Space。

可以看到視窗出現與隱藏了!✧⁑。٩(ˊᗜˋ*)و✧⁕。
現在讓我們加上一些小細節:
- 視窗失去焦點時自動隱藏視窗
- 視窗會出現在滑鼠所在螢幕中往上 1/3 處
- 視窗隱藏後,會自動回復焦點到原本的視窗,這樣才可以繼續輸入
electron\main.ts
// ...

async function createInputWindow() {
  // ...
  newWindow.setMenu(null)

  // 失去焦點時自動隱藏視窗
  newWindow.on('blur', () => {
    newWindow.hide()
  })

  // ...
}

app.whenReady().then(async () => {
  mainWindow = await createInputWindow()

  const ret = globalShortcut.register('CmdOrCtrl+Space', () => {
    if (!mainWindow)
      return

    if (mainWindow?.isVisible()) {
      // focusable 設為 false,才可以讓焦點回到原本位置。例如正在輸入的編輯器
      mainWindow.setFocusable(false)
      mainWindow.hide()

      return
    }

    // 取得滑鼠所在螢幕
    const cursorPoint = screen.getCursorScreenPoint()
    const display = screen.getDisplayNearestPoint(cursorPoint)

    // 設定滑鼠位置之視窗中間往上 1/3 的位置
    const [width, height] = mainWindow.getSize()
    mainWindow?.setPosition(
      Math.floor(display.bounds.x + display.bounds.width / 2 - width / 2),
      Math.floor(display.bounds.y + display.bounds.height / 3 - height / 2),
    )

    mainWindow.setFocusable(true)
    mainWindow.show()
  })

  // ...
})

// ...
可以注意到開關輸入框,並不會影響原本的輸入焦點。
看起來是不是很有模有樣啊!੭ ˙ᗜ˙ )੭
總結 🐟
以上程式碼可以在此取得
- 使用 Electron 開發桌面應用程式
globalShortcut可以綁定全域快捷鍵
下一章讓我們來實作候選功能的部分吧。♪( ◜ω◝و(و
TIP
因為篇幅問題,某些部分簡單帶過。
若想看到更詳細的解釋,請不吝留言或寫信給我喔!(*´∀`)~♥