
CodToys - EP03:顏文字資料庫
上一章節我們完成了快捷鍵開關視窗功能,這一章節我們來實作功能選項部分吧!
開發
本章節預計會建立以下內容:
- 產生 Tray:用來查看狀態與開啟設定視窗
- 儲存設定檔:儲存使用者之 Notion API 資料
- 連接 Notion Database
- 模糊搜尋顏文字資料
產生 Tray
使用 Tray 模組,輕鬆完成。◝( •ω• )◟
同時將 app 的 window-all-closed 事件移到 app.whenReady 中,減少對於全域變數的依賴。
electron\main.ts
import path from 'node:path'
import process from 'node:process'
import {
  app,
  BrowserWindow,
  globalShortcut,
  Menu,
  shell,
  Tray,
} from 'electron'
import { version } from '../package.json'

function createTray(
  {
    mainWindow,
  }: {
    mainWindow: BrowserWindow;
  },
) {
  const tray = new Tray(
    path.join(__dirname, '../public/fish.ico'),
  )
  const contextMenu = Menu.buildFromTemplate([
    {
      label: '暫時停用',
      type: 'checkbox',
      click(item) {
        if (item.checked) {
          globalShortcut.unregisterAll()
        }
        else {
          initGlobalShortcut({ mainWindow })
        }
      },
    },
    {
      label: '詳細設定',
      submenu: [
        {
          label: '開啟設定視窗',
        },
      ],
    },
    {
      label: '關於',
      click: () => shell.openExternal('https://codlin.me/column-cod-toys/01-origin.html'),
    },
    { type: 'separator' },
    {
      label: '退出應用程式',
      click: () => app.quit(),
    },
  ])
  tray.setToolTip(`CodToys v${version}`)
  tray.setContextMenu(contextMenu)

  return tray
}

app.whenReady().then(async () => {
  const mainWindow = await createInputWindow()

  initGlobalShortcut({ mainWindow })

  initIpcMain({ configStore })

  const tray = createTray({ mainWindow })

  app.on('window-all-closed', () => {
    if (process.platform !== 'darwin') {
      app.quit()
    }

    globalShortcut.unregisterAll()
    tray.destroy()
  })
})

app.on('window-all-closed', () => {
  if (process.platform !== 'darwin') {
    app.quit()
  }

  globalShortcut.unregisterAll()
})現在會注意到系統托盤會出現魚的圖示,點擊右鍵會出現更多選單。
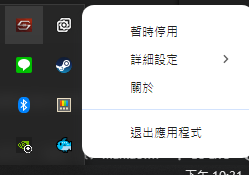
儲存使用者設定
這裡使用 electron-store 來儲存使用者設定。
安裝套件後,第一步先來定義一下使用者設定型別並新增 ConfigApi,用於存取使用者設定。 electron\electron-env.d.ts
export interface MainApi {
  // ...
}

export interface UserConfig {
  kaomoji: {
    databaseId: string;
    token: string;
  };
}
export interface ConfigApi {
  get: () => Promise<UserConfig>;
  update: (data: Partial<UserConfig>) => Promise<void>;
  onUpdate: (callback: (config: UserConfig) => void) => void;
}

declare global {
  interface Window {
    main: MainApi;
    config: ConfigApi;
  }
}

export { }接著在 main process 初始化 store 並註冊 ipcMain。
這裡同時重構一下 ipcMain 的部分,window 相關控制改為針對發送的 window,不限定只能控制 mainWindow。
electron\main.ts
import type { UserConfig } from './electron-env'
import {
app,
BrowserWindow,
ipcMain,
shell,
} from 'electron'
import Store from 'electron-store'
type ConfigStore = Store<{ config: UserConfig }>
function initIpcMain(
{
configStore,
}: {
configStore: ConfigStore;
},
) {
// main
ipcMain.on('main:updateHeight', (event, height: number) => {
const window = BrowserWindow.fromWebContents(event.sender)
接著在 preload 實作 API。
electron\preload.ts
// ...

contextBridge.exposeInMainWorld('config', {
  get() {
    return ipcRenderer.invoke('config:get')
  },
  update(data: Partial<UserConfig>) {
    return ipcRenderer.invoke('config:update', data)
  },
  onUpdate(callback: (config: UserConfig) => void) {
    ipcRenderer.on('config:onUpdate', (event, config) => {
      callback(config)
    })
  },
})現在我們可以儲存設定檔了,還需要一個頁面輸入資料才行。
開啟設定頁面
預計使用 Vue Router,由於 Electron 本身沒有 Web Server,所以沒辦法直接使用 History 模式,這裡我們將 router 改為 Hash 模式解決。
src\main.ts
import { createRouter, createWebHashHistory } from 'vue-router/auto'

// ...

const router = createRouter({
  history: createWebHashHistory(import.meta.env.BASE_URL),
  routes,
})

// ...接著新增設定頁面吧。
src\pages\kaomoji-config\index.vue
<template>
  <q-form
    class="relative flex-col gap-6 p-6"
    @submit="handleSubmit"
  >
    <q-input
      v-model="form.databaseId"
      outlined
      label="databaseId"
    />

    <q-input
      v-model="form.token"
      outlined
      label="token"
    />

    <q-btn
      label="儲存"
      type="submit"
      unelevated
      color="primary"
    />

    <q-inner-loading :showing="isLoading" />
  </q-form>
</template>

<script setup lang="ts">
import type { UserConfig } from '../../../electron/electron-env'
import { useAsyncState } from '@vueuse/core'
import { useQuasar } from 'quasar'
import { clone } from 'remeda'
import { ref } from 'vue'
import { useConfigApi } from '../../composables/use-config-api'

const configApi = useConfigApi()
const $q = useQuasar()

document.title = '顏文字設定'

const form = ref<UserConfig['kaomoji']>({
  databaseId: '',
  token: '',
})

const {
  isLoading,
} = useAsyncState(
  () => configApi.get(),
  undefined,
  {
    onSuccess(data) {
      if (data) {
        form.value = data.kaomoji
      }
    },
  },
)

function handleSubmit() {
  // clone 處理,避免 Error: An object could not be cloned
  configApi.update(clone({
    kaomoji: form.value,
  })).then(() => {
    $q.notify({
      type: 'positive',
      message: '儲存成功',
    })
  }).catch(() => {
    $q.notify({
      type: 'negative',
      message: '儲存失敗',
    })
  })
}
</script>現在讓我們透過 Tray 的選單開啟此設定頁面吧。
建立 createConfigWindow 用於開啟指定頁面並將目標 route path 加在 # 後面即可。
// ...

async function createConfigWindow(route: keyof RouteNamedMap) {
  const newWindow = new BrowserWindow({
    backgroundColor: '#fff',
    webPreferences: {
      preload: path.join(__dirname, './preload.js'),
    },
  })
  // 隱藏預設系統選單
  newWindow.setMenu(null)

  if (process.env.VITE_DEV_SERVER_URL) {
    await newWindow.loadURL(
      `${process.env.VITE_DEV_SERVER_URL}#${route}`,
    )
    // newWindow.webContents.openDevTools()
  }
  else {
    // loadFile 可以指定 hash
    await newWindow.loadFile('dist/index.html', {
      hash: route,
    })
  }

  return newWindow
}

// ...

function createTray(
  // ...
) {
  // ...
  const contextMenu = Menu.buildFromTemplate([
    // ...
    {
      label: '詳細設定',
      submenu: [
        {
          label: '開啟設定視窗',
          click: () => createConfigWindow('/kaomoji-config/'),
        },
      ],
    },
    // ...
  ])
  // ...
}

// ...TIP
RouteNamedMap 是 unplugin-vue-router 自動產生的型別,用於定義所有頁面路由與參數。
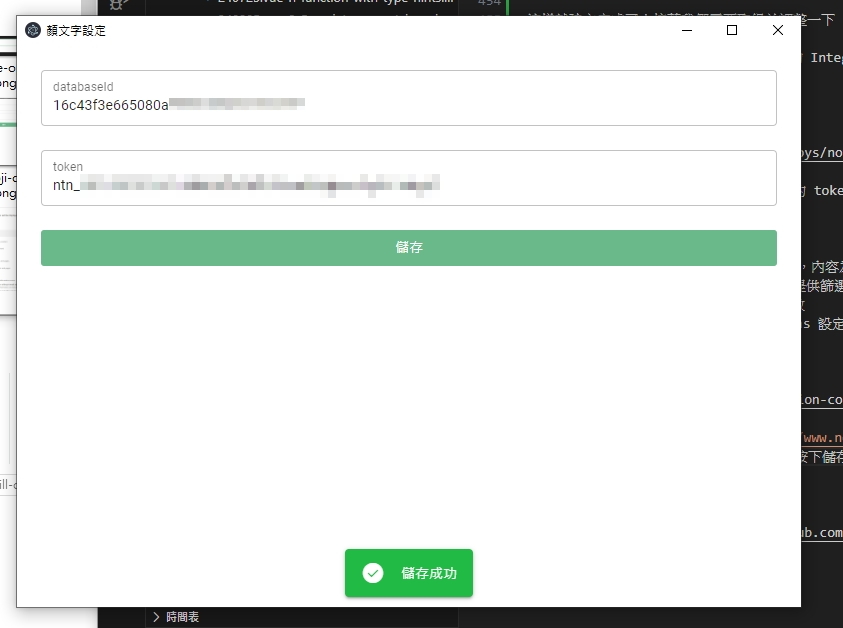
現在讓我們從 Tray 開啟設定頁面看看吧!(/≧▽≦)/
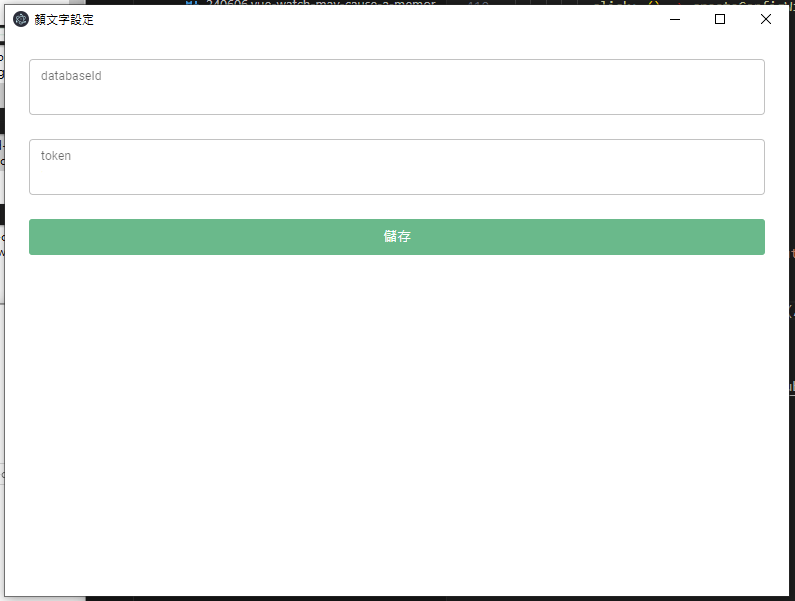
...可以看到畫面相當簡潔有力,有機會再來慢慢美化吧。( •̀ ω •́ )✧
連接 Notion Database
現在讓我們透過 Notion API 來連接指定的 Database 吧!
首先需要先建立 Integrations,前往設定頁面並依照步驟建立。
- 點擊畫面中的「+ New integration」
- Associated workspace 選擇要使用的 Workspace
- Type 選擇 Internal
- 按下 Save
這樣就建立完成了!接著我們需要取得並調整一下 Token 設定。
在 Integrations 頁面中,點擊剛剛建立的 Integration,會進到設定頁面,讓我們限縮以下此 Token 權限,保持最小權限原則。
基本上就是只有 Read 權限,如下圖。
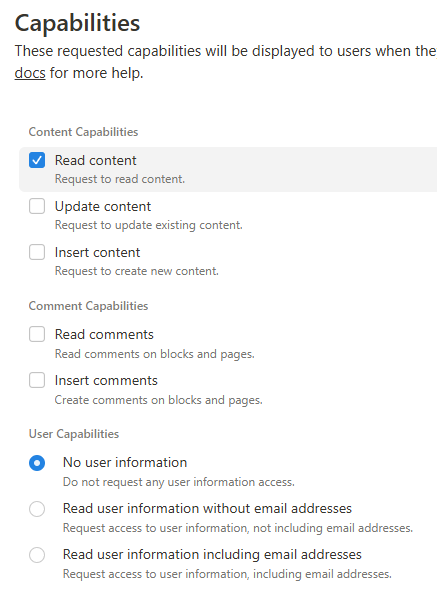
複製 Internal Integration Secret 中的 token,並貼到設定頁面中。
接著來建立 Database。
- 將原本預設的 Name 欄位改名為 value,內容為顏文字
- 新增一個名為 tags 的多選欄位,用來提供篩選資料
- 將 database 使用 open as page 開啟
- 點擊最右上角的三個點,將 Connections 設定為剛剛建立的 Integration
完成後結果會如下圖。
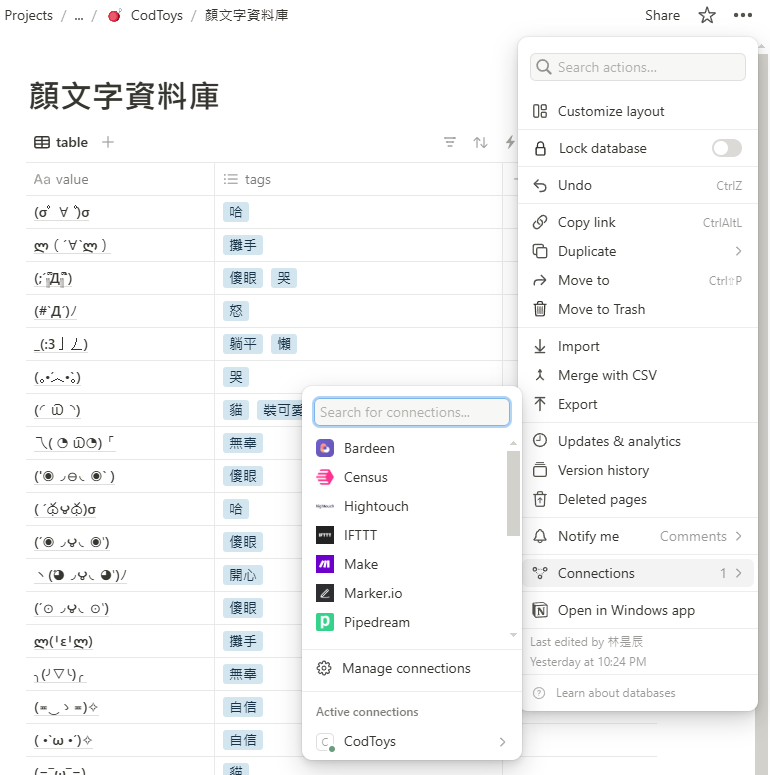
最後目前網頁的 URL 會是 https://www.notion.so/{workspace}/{databaseId}?xxx,將此 URL 中的 databaseId 複製下來,貼到設定頁面中後按下儲存即可。
取得 Notion Database 資料
現在設定資料有了,讓我們串接 Notion API 吧。
安裝 @notionhq/client 套件來存取 Notion API 並加入取得資料邏輯。
src\domains\feature-card-kaomoji\index.vue
<template>
  <template v-if="visible">
    <feature-option
      v-if="!isFeature"
      class="p-4"
      icon="emoticon"
      text="輸入 @ 搜尋顏文字"
      :action="() => setText('@')"
    />

    <template v-else>
      <feature-option
        v-for="item, i in list"
        :key="i"
        class="w-full px-4 py-2"
        :action="() => copy(item.value)"
      >
        <div class="flex-1">
          {{ item.value }}
        </div>

        <div class="flex">
          <q-chip
            v-for="tag in item.tags"
            :key="tag"
            :label="tag"
          />
        </div>
      </feature-option>
    </template>
  </template>
</template>

<script setup lang="ts">
import type { UserConfig } from '../../../electron/electron-env'
import { Client } from '@notionhq/client'
import { useAsyncState } from '@vueuse/core'
import dayjs from 'dayjs'
import { get } from 'lodash-es'
import { pipe, reduce, take } from 'remeda'
import { computed, ref, shallowRef, triggerRef } from 'vue'
import FeatureOption from '../../components/feature-option.vue'
import { useConfigApi } from '../../composables/use-config-api'
import { useFeatureStore } from '../../stores/feature.store'

const configApi = useConfigApi()
const featureStore = useFeatureStore()

// ...

const {
  state: config,
  execute: refreshConfig,
} = useAsyncState(
  () => configApi.get(),
  undefined,
  { immediate: false },
)

let notionClient: Client | undefined
function initNotionClient(config: UserConfig) {
  notionClient = new Client({
    auth: config.kaomoji.token,
  })
}

const updatedAt = shallowRef(dayjs())
const notionData = shallowRef<any[]>([])
const startCursor = ref('')
const {
  isLoading: isDataLoading,
  execute: getData,
} = useAsyncState(
  async () => {
    const databaseId = config.value?.kaomoji.databaseId
    if (!databaseId) {
      throw new Error('尚未設定 databaseId')
    }

    return notionClient?.databases.query({
      database_id: databaseId,
      start_cursor: startCursor.value ? startCursor.value : undefined,
    })
  },
  undefined,
  {
    immediate: false,
    onSuccess(result) {
      notionData.value.push(...(result?.results ?? []))

      if (result?.has_more && result.next_cursor) {
        startCursor.value = result.next_cursor
        getData()
        return
      }

      triggerRef(notionData)
      updatedAt.value = dayjs()
    },
  },
)

function refreshData() {
  startCursor.value = ''
  notionData.value = []
  getData()
}

interface ListItem {
  value: string;
  tags: string[];
}
const list = computed(() => pipe(
  notionData.value,
  reduce((acc: ListItem[], result) => {
    acc.push({
      // @notionhq/client 的型別與實際資料有點出入,自行從回應判斷
      value: get(result, 'properties.value.title[0].plain_text', '') as string,
      tags: pipe(
        get(result, 'properties.tags.multi_select', []) as { name: string }[],
        (value) => {
          if (!value) {
            return []
          }

          return value.map((item) => item.name)
        },
      ),
    })

    return acc
  }, []),
  // 先顯示 5 個看看
  take(5),
))

configApi.onUpdate(async (config) => {
  init(config)
})

async function init(config?: UserConfig) {
  const _config = config ?? await refreshConfig()
  if (!_config) {
    return
  }

  initNotionClient(_config)
  refreshData()
}
init()
</script>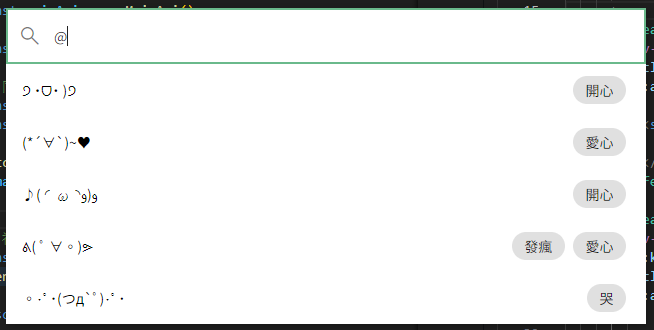
資料進來了!( ´ ▽ ` )ノ
接著新增更新用的按鈕,讓使用者可以手動更新資料。
src\domains\feature-card-kaomoji\index.vue
<template>
  <template v-if="visible">
    <feature-option
      v-if="!isFeature"
      ...
    />

    <template v-else>
      <feature-option
        v-for="item, i in list"
        :key="i"
        ...
      >
        ...
      </feature-option>

      <feature-option
        class="relative w-full bg-primary/10 p-4"
        :action="() => refreshData()"
      >
        <div class="w-full flex items-center justify-around">
          <span class="flex-1">
            更新資料
          </span>
          <span class="flex-1 text-right text-xs text-gray-500">
            共 {{ list.length }} 筆,最後更新於 {{ updatedAt.format('YYYY/MM/DD HH:mm:ss') }}
          </span>
        </div>

        <q-inner-loading :showing="isDataLoading" />
      </feature-option>
    </template>
  </template>
</template>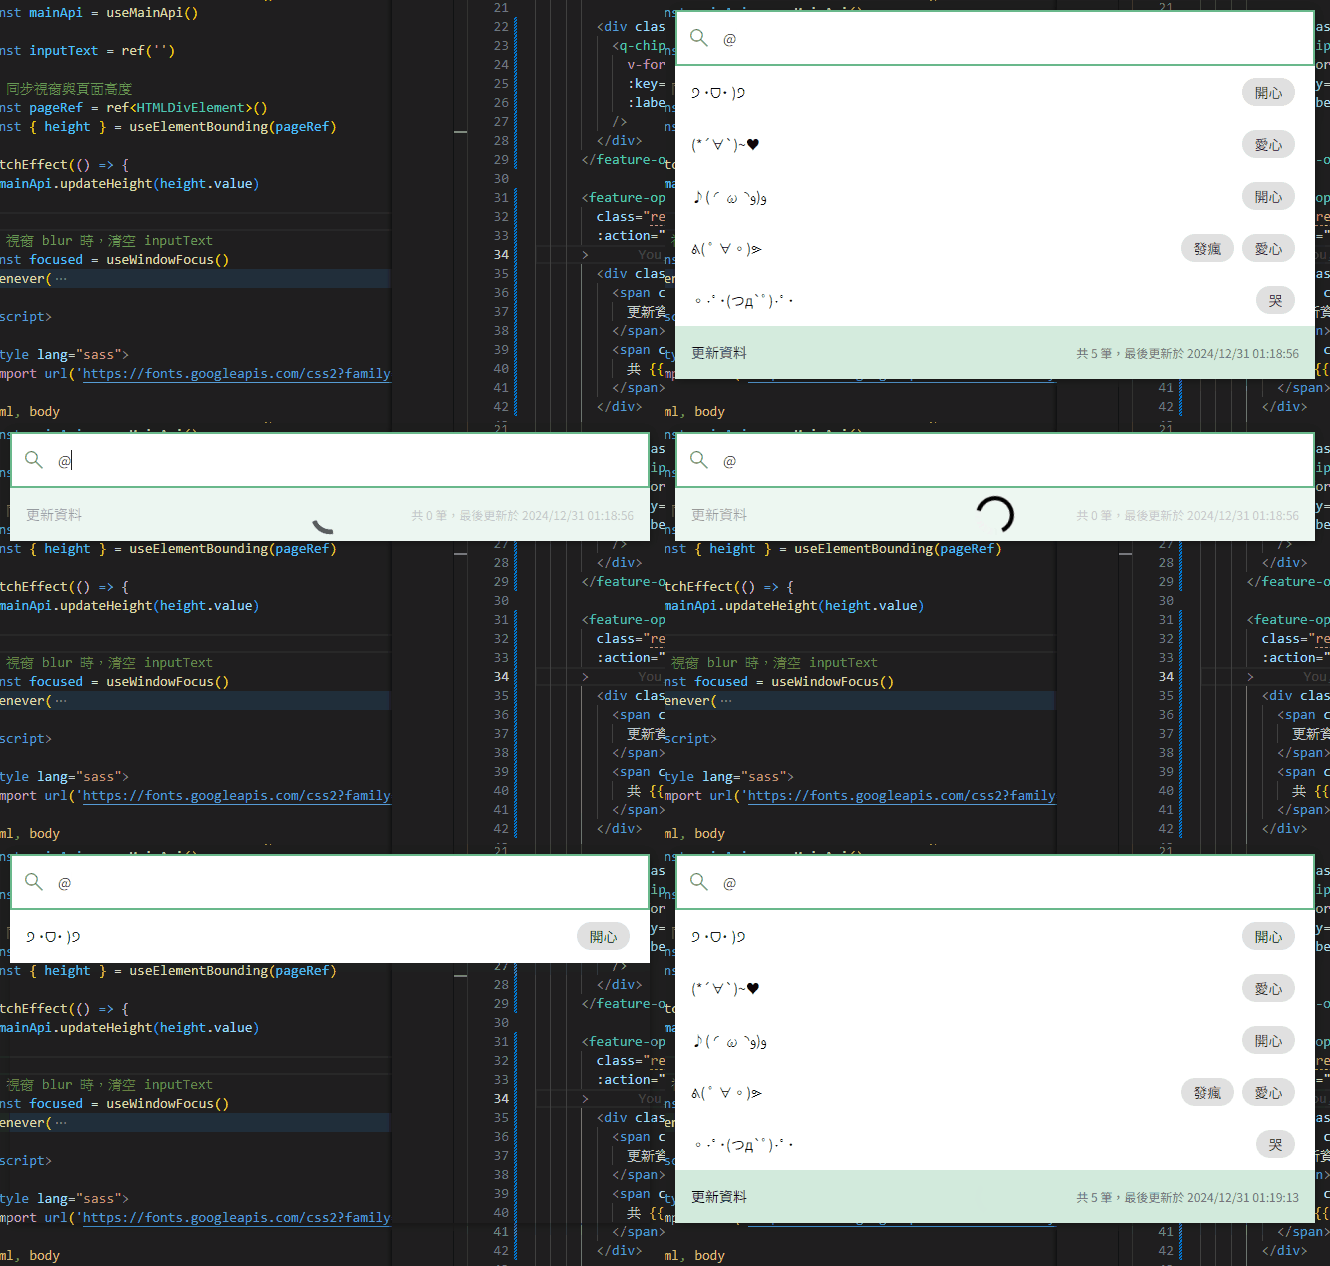
由於資料可能很多,最後讓我們實現分頁功能吧!
src\domains\feature-card-kaomoji\index.vue
<template>
  <template v-if="visible">
    <feature-option
      v-if="!isFeature"
    />

    <template v-else>
      <!-- WARNING -->
      <div
        :key="pagination.page"
        class="flex-col"
      >
        <feature-option
          v-if="nextPageVisible"
          class="w-full px-4 py-2"
          :action="() => nextPage()"
        >
          <span class="flex-1">
            下一頁 ({{ pagination.page + 1 }}/{{ totalPages }})
          </span>
        </feature-option>

        ...
      </div>
    </template>
  </template>
</template>

<script setup lang="ts">
import { chunk, pipe } from 'remeda'
import { computed, nextTick, ref } from 'vue'
import FeatureOption from '../../components/feature-option.vue'

// ...

const pagination = ref({
  page: 0,
  itemsPerPage: 5,
})
watch(inputText, () => {
  pagination.value.page = 0
})
const totalPages = computed(() => Math.ceil(list.value.length / pagination.value.itemsPerPage))

const paginationList = computed(() => pipe(
  list.value,
  chunk(pagination.value.itemsPerPage),
  (data) => data[pagination.value.page] ?? [],
))

const nextPageVisible = computed(() => totalPages.value > 1)
async function nextPage() {
  pagination.value.page += 1
  pagination.value.page %= totalPages.value

  await nextTick()
  featureStore.setOption(featureStore.optionIdList[0] ?? '')
}

configApi.onUpdate(async (config) => {
  init(config)
})

// ...
</script>WARNING
程式碼中有個 <!-- WARNING --> 部分,:key="pagination.page" 是為了在換頁時強制重新渲染,才能保證所有 option 順序一致,這個方法會有不必要的性能損號,未來再來改進。
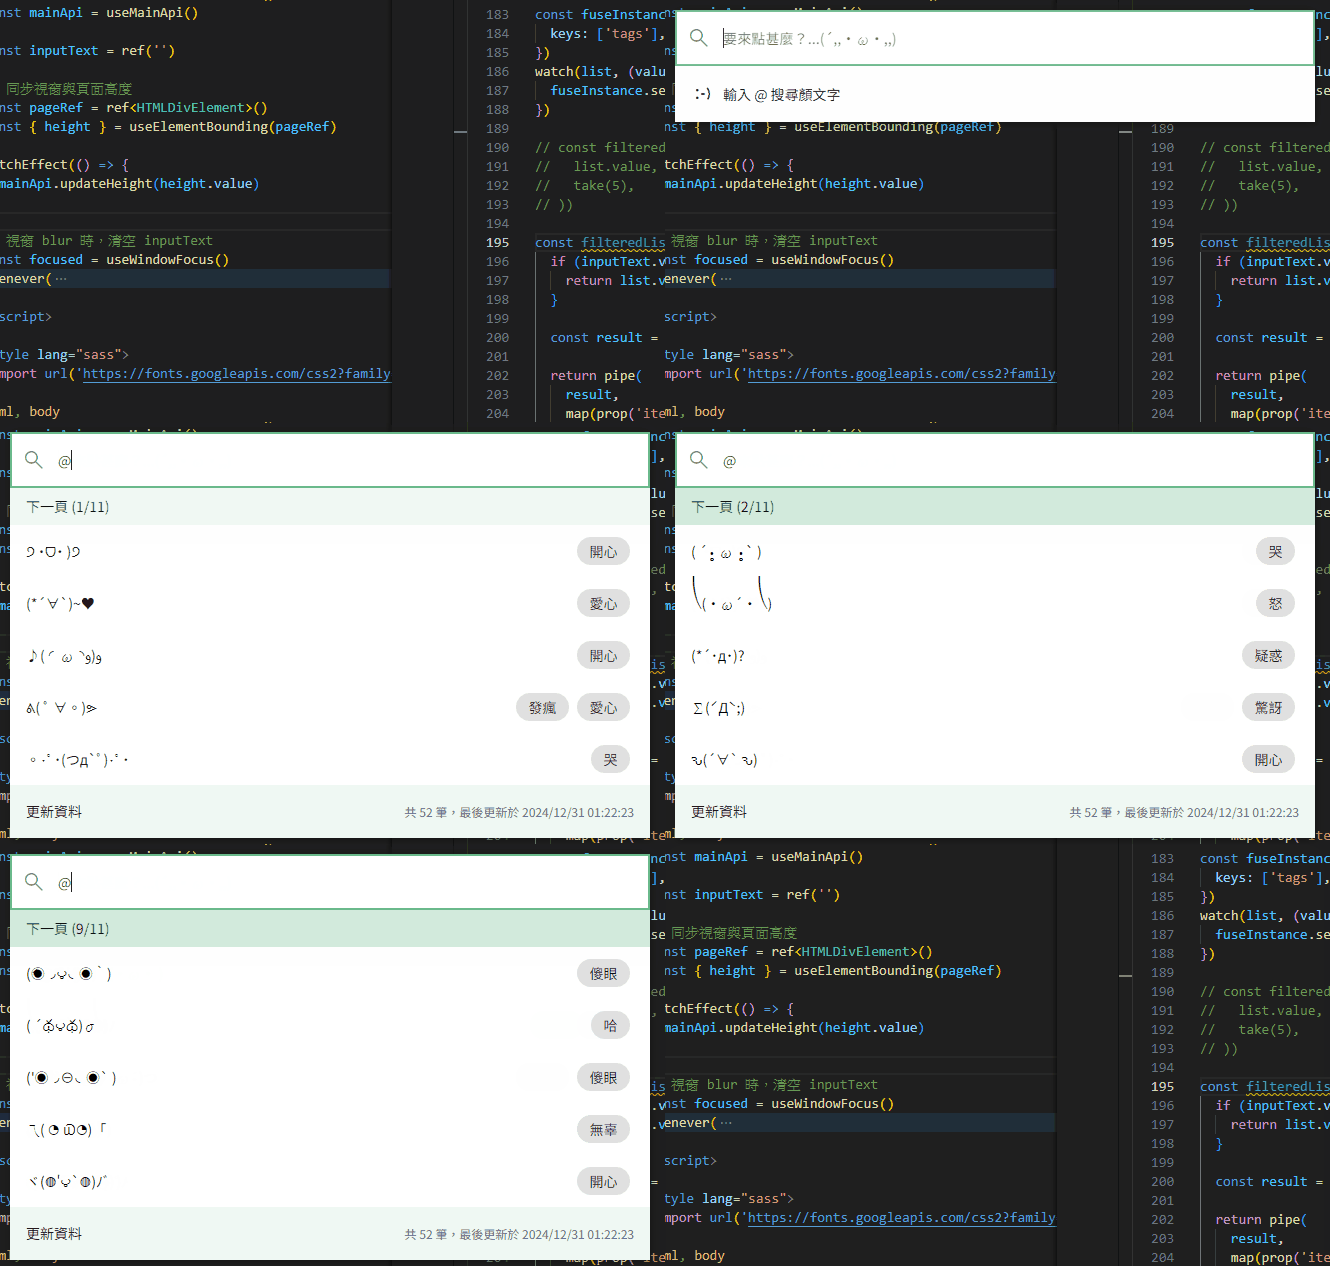
所有的資料都進來了!✧⁑。٩(ˊᗜˋ*)و✧⁕。
模糊過濾
最後讓我們來實作模糊過濾功能吧!
我們希望即使只有部分文字符合,也能候選最接近的資料。
這裡使用 fuse.js 實作模糊過濾功能。
這個部份很單純,困難的部分 fuse.js 已經幫我們處理好了,我們只要爽爽用就行惹。ψ(`∇´)ψ
src\domains\feature-card-kaomoji\index.vue
// ...

<script setup lang="ts">
// ...

const fuseInstance = new Fuse(list.value, {
  keys: ['tags'],
})
watch(list, (value) => {
  fuseInstance.setCollection(value)
})

const filteredList = computed(() => {
  if (inputText.value === '@') {
    return list.value
  }

  const text = pipe(
    inputText.value,
    (value) => {
      if (value.startsWith('@')) {
        return value.slice(1)
      }

      return value
    },
    (value) => value.trim(),
  )

  const result = fuseInstance.search(text)

  return pipe(
    result,
    map(prop('item')),
  )
})

// ...

const totalPages = computed(() => Math.ceil(
  list.value.length / pagination.value.itemsPerPage,
  filteredList.value.length / pagination.value.itemsPerPage,
))

const paginationList = computed(() => pipe(
  list.value,
  filteredList.value,
  chunk(pagination.value.itemsPerPage),
  (data) => data[pagination.value.page] ?? [],
))

// ...
</script>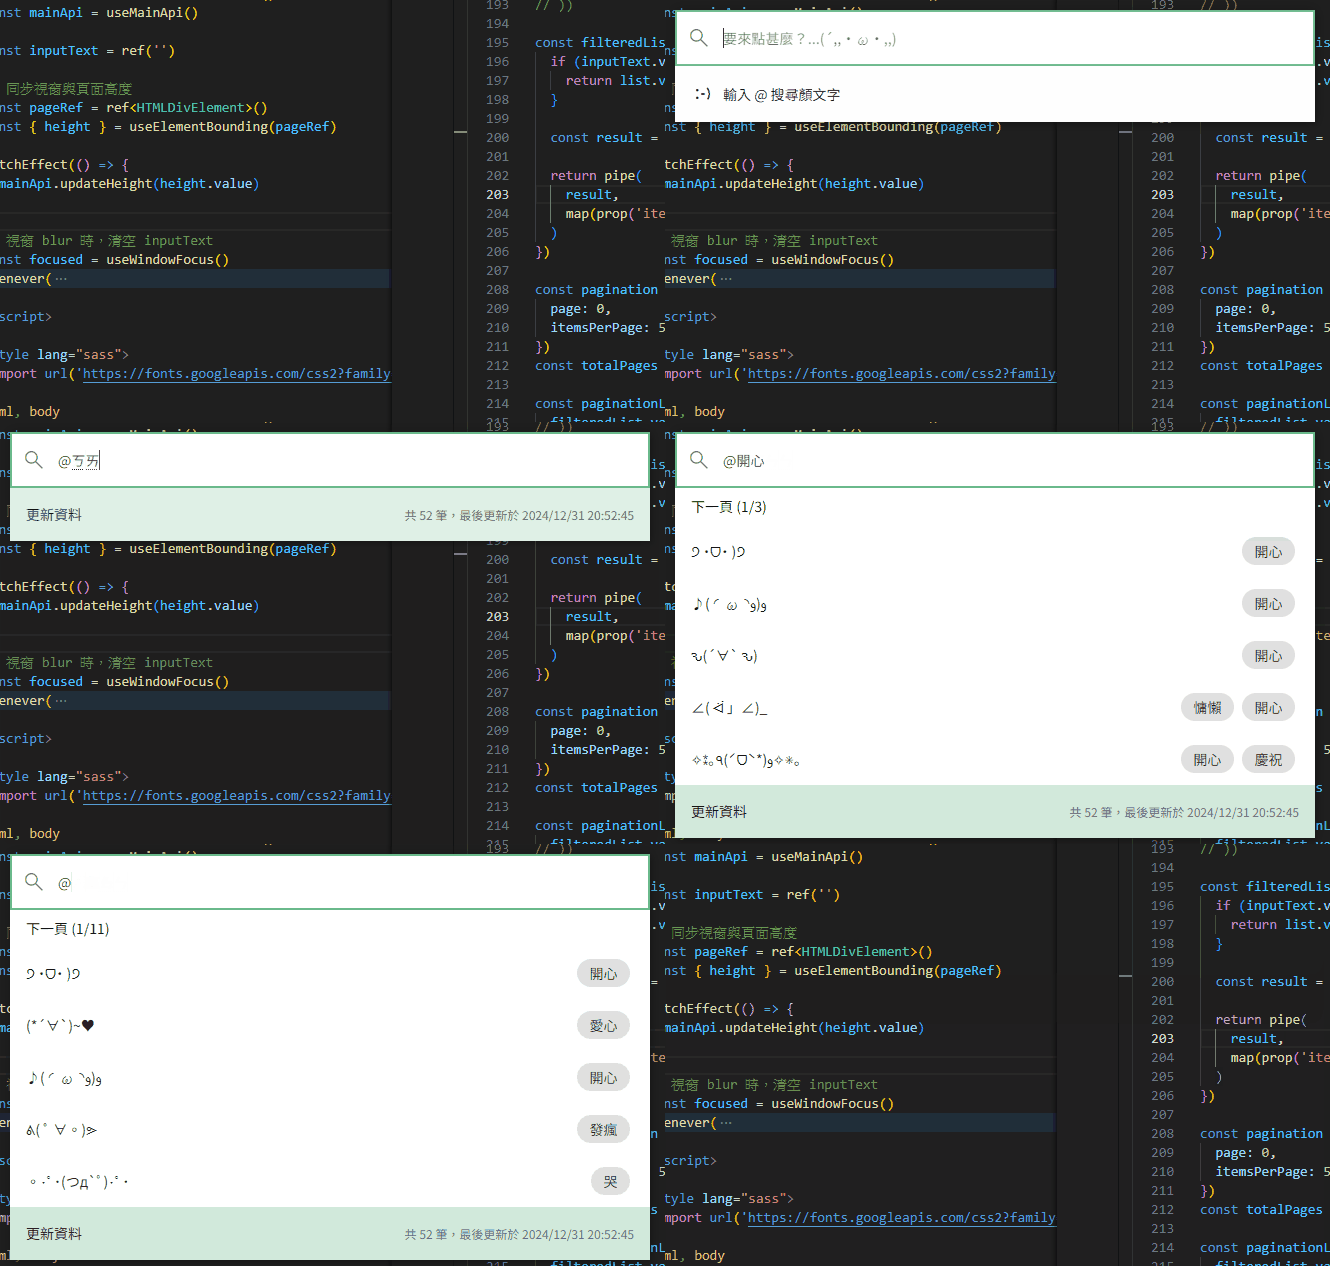
就這麼簡單。(*´∀`)~♥
現在讓我們完整的展示一次功能。
- 輸入 @ 可以開始搜尋顏文字
- 沒有匹配任何功能時,則開啟 Google 搜尋
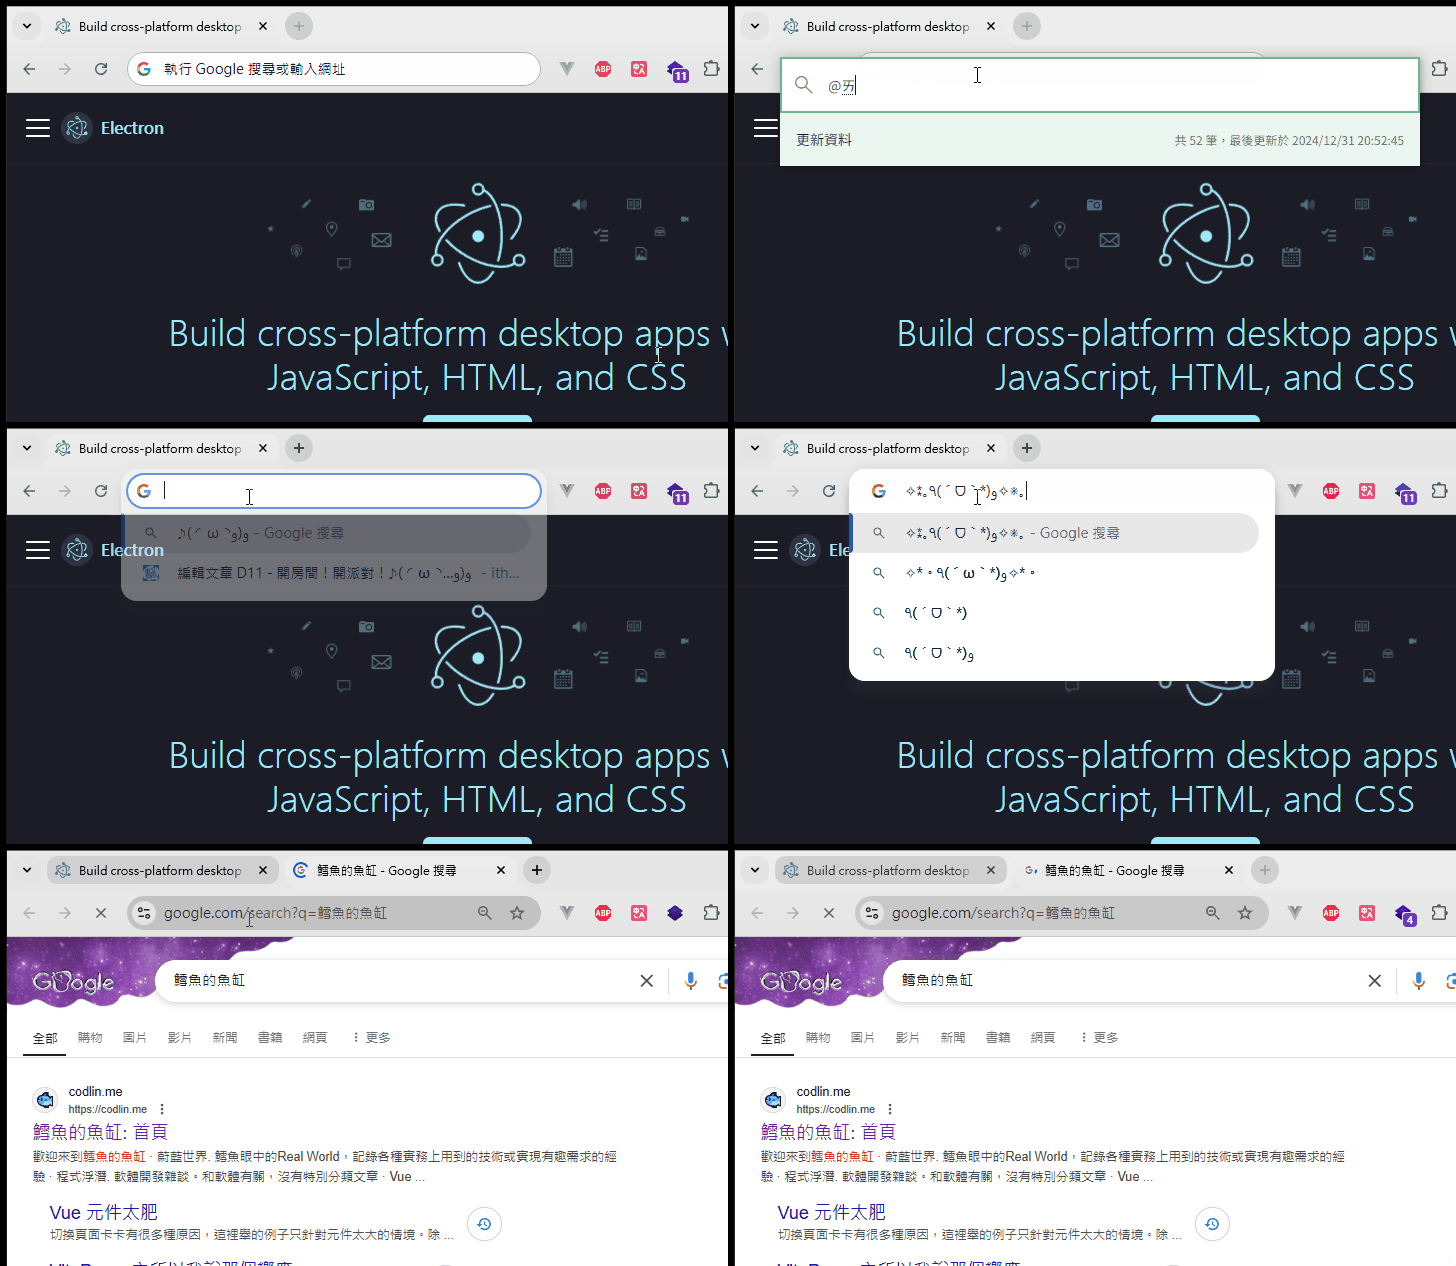
感覺超讚!✧⁑。٩(ˊᗜˋ*)و✧⁕。
改進與重構
實際上使用後發現有些地方需要改進,讓我們來改進一下吧!੭ ˙ᗜ˙ )੭
取消滑鼠 hover 效果
滑鼠 hover 效果會讓使用者混淆目前選項,狠心刪除。ԅ( ˘ω˘ԅ)
src\components\feature-option.vue
// ...

<script setup lang="ts">
// ...
const optionRef = ref<HTMLDivElement>()
const isHover = useElementHover(optionRef)
const selected = computed(
  () => isHover.value || featureStore.selectedOptionId === id,
)
const selected = computed(() => featureStore.selectedOptionId === id)
</script>feature-option 重複使用時,選擇順序錯誤問題
剛剛提到 <!-- WARNING --> 強制更新部分,這裡我們來改進一下。
featureStore 註冊 option 時,多提供元件 y 座標位置,只要根據 y 座標排序,選項順序就會同步自然順序了。
src\stores\feature.store.ts
import { defineStore } from 'pinia'
import { map, pipe, sortBy } from 'remeda'
import { computed, shallowRef } from 'vue'

interface OptionValue {
  y: number;
  action: () => void;
}

export const useFeatureStore = defineStore('feature', () => {
  const optionMap = shallowRef(new Map<string, OptionValue>())
  const optionIdList = computed(() => pipe(
    [...optionMap.value.keys()],
    /** 依照數字排序,保證 option 順序 */
    sortBy((id) => Number.parseInt(id.replace(/\D/g, ''), 10)),
    [...optionMap.value.entries()],
    /** 依照畫面 y 座標排序,保證 option 自然順序 */// [!code ++]
    sortBy((data) => data[1].y),
    map(([id]) => id),
  ))

  // ...
})feature-option 元件註冊時提供 y 座標。
src\components\feature-option.vue
// ...

<script setup lang="ts">
// ...

const { y } = useElementBounding(optionRef)

featureStore.addOption(id, {
  action: props.action,
})

watch(y, (value) => {
  featureStore.addOption(id, {
    y: value,
    action: props.action,
  })
})
// ...
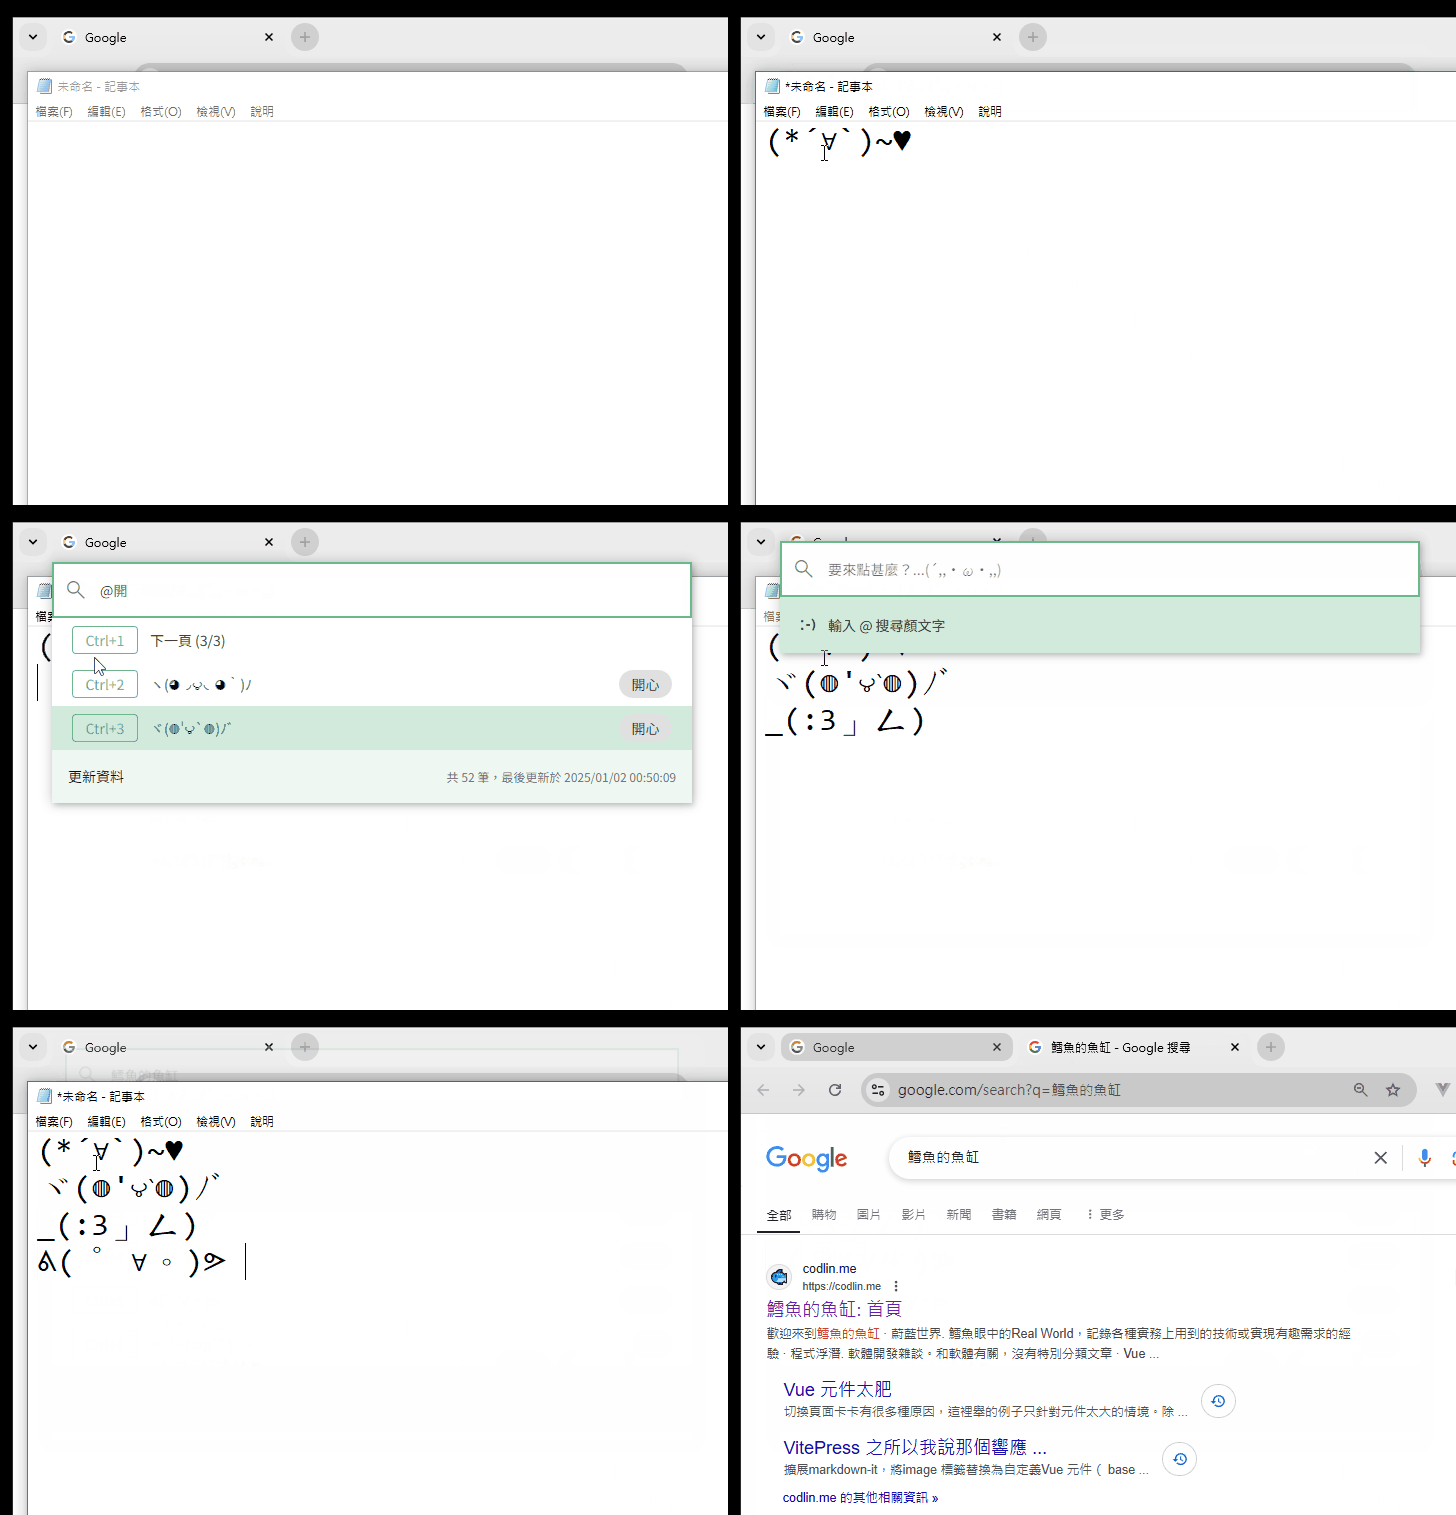
</script>數字鍵盤快速選擇
一直按上下鍵有點麻煩,加個使用數字鍵快速選擇功能。( •̀ ω •́ )✧
使用 VueUse 的 useMagicKeys 輕鬆實現。(´,,•ω•,,)
開始前先讓我們整理、重構一下內容,讓元件內的程式碼更內聚一點。
元件與資料可以獨立存在,所以首先抽離資料部分。
src\domains\feature-card-kaomoji\use-kaomoji-data.ts
// ...

export function useKaomojiData(
  inputText: Ref<string>,
) {
  const configApi = useConfigApi()
  const featureStore = useFeatureStore()

  const {
    state: config,
    execute: refreshConfig,
  } = useAsyncState(
    // ...
  )

  let notionClient: Client | undefined
  function initNotionClient(config: UserConfig) {
    // ...
  }

  const updatedAt = shallowRef(dayjs())
  const notionData = shallowRef<any[]>([])
  const startCursor = ref('')
  const {
    isLoading,
    execute: getData,
  } = useAsyncState(
    // ...
  )

  function refreshData() {
    // ...
  }

  interface ListItem {
    value: string;
    tags: string[];
  }
  const list = computed(() => pipe(
    // ...
  ))

  const fuseInstance = new Fuse(list.value, {
    keys: ['tags'],
  })
  watch(list, (value) => {
    fuseInstance.setCollection(value)
  })

  const filteredList = computed(() => {
    // ...
  })

  const pagination = ref({
    page: 0,
    itemsPerPage: 5,
  })
  watch(inputText, () => {
    pagination.value.page = 0
  })
  const totalPages = computed(() => Math.ceil(
    filteredList.value.length / pagination.value.itemsPerPage,
  ))

  const paginationList = computed(() => pipe(
    // ...
  ))

  async function nextPage() {
    // ...
  }

  configApi.onUpdate(async (config) => {
    init(config)
  })

  async function init(config?: UserConfig) {
    // ...
  }

  return {
    isLoading,
    updatedAt,

    list,

    pagination,
    paginationList,
    totalPages,
    nextPage,

    init,
    refreshData,
  }
}基本上就是把資料的部份抽離,所以具體內容就不贅述了。
現在元件內部變得相當簡潔。
src\domains\feature-card-kaomoji\index.vue
<template>
  ...
</template>

<script setup lang="ts">
import { computed } from 'vue'
import { useKaomojiData } from './use-kaomoji-data'

// ...

function copy(text: string) {
  // ...
}

const {
  isLoading,
  updatedAt,
  pagination,
  paginationList,
  list,
  nextPage,
  totalPages,
  refreshData,
  init,
} = useKaomojiData(inputText)
init()

const nextPageVisible = computed(() => totalPages.value > 1)
</script>現在讓我們在 featureStore 新增一個 method。
src\stores\feature.store.ts
// ...
export const useFeatureStore = defineStore('feature', () => {
  // ...
  function setOptionByIndex(index: number) {
    selectedOptionId.value = optionIdList.value[index] ?? ''
  }
  // ...

  return {
    // ...
    setOptionByIndex,
  }
})最後在元件中使用 useMagicKeys 並加上快捷鍵提示吧。੭ ˙ᗜ˙ )੭
src\domains\feature-card-kaomoji\index.vue
<template>
  <template v-if="visible">
    <feature-option
      v-if="!isFeature"
      ...
    />

    <template v-else>
      <feature-option
        v-if="nextPageVisible"
        ...
      >
        <q-chip
          v-if="isFeature"
          label="Ctrl+1"
          square
          outline
          color="primary"
        />
        <span class="flex-1">
          下一頁 ({{ pagination.page + 1 }}/{{ totalPages }})
        </span>
      </feature-option>

      <feature-option
        v-for="item, i in paginationList"
        :key="i"
        ...
      >
        <q-chip
          v-if="isFeature"
          :label="`Ctrl+${i + textStartIndex}`"
          square
          outline
          color="primary"
        />

        ...
      </feature-option>

      ...
    </template>
  </template>
</template>

<script setup lang="ts">
// ...

const nextPageVisible = computed(() => totalPages.value > 1)

const textStartIndex = computed(() => nextPageVisible.value ? 2 : 1)

const { current } = useMagicKeys()

watch(current, (keySet) => {
  // 僅使用此功能才作用,避免干擾其他功能
  if (!isFeature.value || keySet.size === 0)
    return

  if (!keySet.has('control'))
    return

  /** 1~6 */
  const numberKey = [...keySet].find((key) => key.match(/^[1-6]$/))
  if (numberKey) {
    const index = Number(numberKey) - 1
    featureStore.setOptionByIndex(index)
    featureStore.currentOption?.action()
  }
}, { deep: true })
</script>現在我們可以很快速地選擇目標顏文字了!( •̀ ω •́ )✧
總結 🐟
以上程式碼可以在此取得
- 串接 Notion API,完成顏文字資料庫功能
- 抽離、重構程式碼,讓程式碼更具內聚性
- 加入快捷鍵功能,讓使用者更快速選擇顏文字
感覺還可以加入很多很有趣的功能,歡迎大家留言或寫信許願喔!(´▽`ʃ♡ƪ)
TIP
因為篇幅問題,某些部分簡單帶過。
若想看到更詳細的解釋,請不吝留言或寫信給我喔!(*´∀`)~♥